Remedying the First Barrier to Study:
The Absence of Mass
Since not everyone studying something has the actual mass of what they are studying available—such as a tractor or apples—useful tools to remedy a lack of mass have been developed. These come under the subject of demonstration.
Demonstration means the action of showing or pointing out something to make it clear how something is done or how it works. It also means teaching or showing by doing something.
One way to supply the mass and help sort things out is to do a demonstration. There is a very simple type of demonstration commonly used in study that will help you get a balance of mass with the significance you are studying. It is to use a demonstration kit.
1. DEMONSTRATION KIT
A kit is a group of things that are kept together, often in the same container, so that they can be used for a particular purpose.
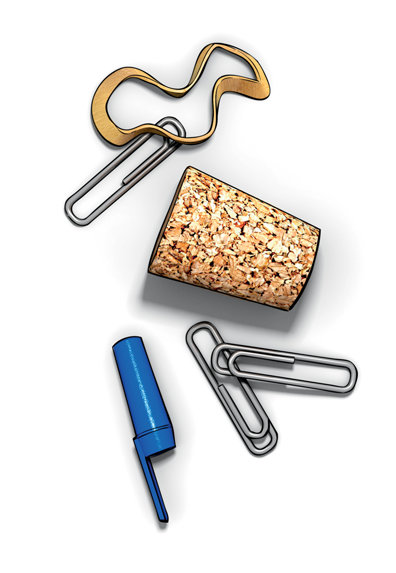
A demonstration kit or demo kit is a collection of various small objects such as corks, bottle caps, paper clips, pen tops, rubber bands, etc. The objects are used to demonstrate (show) something in order to help you to understand it.

The pieces of a demo kit are usually stored in a container and ready for use in demonstrating ideas, facts, laws and even showing the meanings of words. Factually, anything can be demonstrated using a demo kit.
You can use the objects and items in a demo kit on a table or desk to demonstrate anything you are studying.
The basic purpose of a demo kit is to demonstrate understanding.
If you run into something you are studying that you can’t figure out, a demo kit can help you sort it out and understand it. Let’s say you realize there is a series of steps to doing something and it isn’t clear to you, so you use the mass of a demo kit to work it out.
Let’s take the example of a very simple action you might need to demonstrate, such as making a cup of tea. You could use a demo kit to get some mass and help you work out the steps. You might:
Use a bottle cap to represent the kettle and a rubber band to represent the water that goes into the kettle.
Use some paper clips to represent the fire or stove top on which you put the kettle to heat the water.
Use pen tops to represent the cup and a cork to represent the teapot into which you add the tea (using another object from the demo kit).
Now you can lift the kettle off the fire or stove and add the water and tea to the pot, pour the tea into the cup and, using other items from the kit, add milk or cream and a sweetener.
As the first barrier to study is an absence of mass, using the solid items of a demo kit to represent the significances you are sorting out is one way to add the mass you need for understanding.
2. CLAY DEMONSTRATIONS
An extremely valuable tool in studying any subject is the use of clay to demonstrate something. It could be ideas, facts, laws or even showing the meanings of words or any part of anything you are studying. This is called a “clay demonstration” or “clay demo.”
The purposes of clay demonstration are:
1. To make the materials being studied real to you by demonstrating them in clay
2. To give you a proper balance of mass and significance
3. To teach you to apply
You use your hands and clay to make rough models of the objects, people or significances you are studying. This is done to get a full balance of the mass with the significance and to figure out and sort out anything you might be confused about.
You can use several different colors of clay, but the colors don’t have any special meaning. Colors are only used to help you see the differences between objects, people and the things you make in clay.
Anything at all can be represented in clay. There are no limits to what you can make and show in a clay demonstration. The only limitation could be your lack of understanding.
If you can show something in a clay demonstration, you understand it. If you can’t, you really don’t understand what it is. When you work things out in a clay demonstration, it actually helps bring about an understanding of them.
Your clay must show the subject you are representing. It must not be just a blob of clay. But art has nothing to do with clay demonstrations. What you make in clay does not have to look beautiful. The objects you make do not have to include small details. They can be rough models to represent the objects you are making.
But your clay demonstrations must be large.
If you make a small clay demonstration, you will not be following the purpose of why you are making it in clay. It is the mass of the clay that helps you to understand and work things out. Small demonstrations don’t have much mass. Making large objects, people and things in your clay demonstration gives you lots of mass and that is a very important part of what you are doing.
Labeling
Everything you make in clay must be labeled and you must label each part as you go along. You can make labels out of small strips of paper or a card.
You don’t make all the objects and then come back and put labels on all of them. As you make an object, you label it. Then make the next object and label it and so on. You must do this to keep the balance of mass and significance as you keep going.
When you have completed the whole clay demonstration, you make one overall label that describes what it is.
If someone is helping you with your study, you can show him your clay demonstration, but do not show him the overall label and do not say anything—just let him see what you did. He just looks at your clay and figures out what it is and tells you. Then you show him your overall label.
If he can just look at and understand the demonstration and see what you have made in clay, without you explaining it to him or showing him the overall label, you know your demonstration was successfully done.
Example:
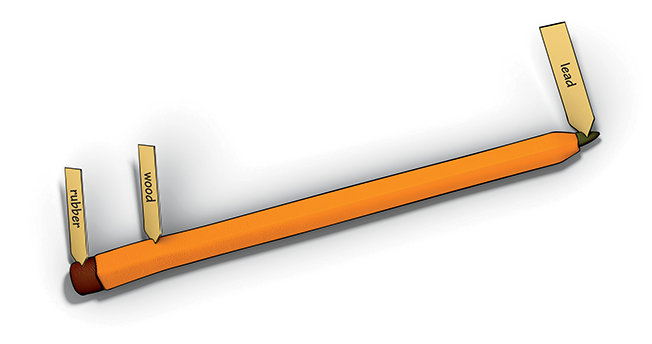
For example, let’s say you need to do a clay demonstration of a pencil. You would make a thin roll of clay to represent the lead and an outer layer of clay to represent the wood, with the thin lead sticking out a bit at one end. You label the thin roll “lead” and label the outer layer “wood.”
You make a small cylinder of clay and stick it on one end and label it “rubber” or “eraser.” Then you make an overall label saying “It is a pencil.”
When you are done with your clay demonstration you can show it to someone else if you like, especially someone working with you to help you with your studies. But first you must remove the overall label, “pencil,” before he can see it. Then, if he can look at your demo and say, “It’s a pencil,” you know you have successfully demonstrated it in clay.

The direction in which something travels is usually shown with a little arrow made of clay and labeled as to what it represents.
This is important because sometimes a clay demonstration can be confusing if you cannot see the direction things are moving or the sequence of something that happens.
3. SKETCHING
Sketching is the action of making a simple, quick drawing that does not show much detail.
Sketching is also a part of demonstration and is something you can do to give a balance of mass with significance and help you work things out.
You can be sitting at a desk, trying to work something out or studying something that you can’t grasp. You can take a pencil and paper and sketch it out and get a grip on it. Let’s say you wanted to work out a plan or something for a chart—you could do a sketch to help clarify it for yourself.
Absence of Mass and then test your understanding again.

